It’s an interesting fact that many people tend to read the subtitle at the bottom of the screen on the TV, the computer, and mobile devices, we do it unconsciously. Partially because audio retention is lesser than visual, besides, the subtitles are read more quickly than the corresponding line is said on the soundtrack. So if you have edited some videos and want people to understand the content easily and get good views, you had better add subtitles to the video.
In this article, we will break down some facts to show why you need to add subtitles to video, so you will know why subtitles are necessary in most cases. Afterward, you will learn how to add subtitles to the video step by step with the help of the free Windows video editor MiniTool Movie Maker and some online tools.
There are Some Facts about Subtitles that You Should Know
- Many surveys reveal that people like to turn captions or subtitles on when they watch movies, videos and play YouTube videos.
- Clear subtitles are good for foreign language learners to increase their reading speed and enhance listening comprehension, in addition, they can read the subtitles repeatedly if they want to confirm if he or she completely understands the video content.
- Under some circumstances, people can’t turn on audio because they are using mobile devices in public, for example when they are on the bus, in the library, or museum. Reading the captions helps them understand video content with no problem.
- There are up to 350 million people in the world who rely on hearing aids. They will comprehend your videos much easier if there are subtitles at the bottom of the screen.
Approach One. Add Subtitles to Video with the Help of FreeSoftware
If you do some search on Google, you will find plenty of software that can add captions or subtitles to video files. For the past years, many users have tried Windows Movie Maker to add subtitles video. However, the tool is no longer available for download, besides, more and more users who keep using the old version begin to encounter different notice error messages when they edit video with Windows Movie Maker.
MiniTool Software company has been providing professional disk management (MiniTool Partition Wizard), data recovery solutions, data backup, and restore tools to millions of users in more than 180 countries in the past 10 years. So far MiniTool software products have been mentioned by many high authority technology sites such as PCWorld, Tech AdvisorCCM, TechRadar, LifeHacker, CNET, PCWorld, LifeWire, Softpedia, etc. In recent years, they have added multimedia software to their product line. We’ll proceed to show how to use MiniTool Movie Maker to add text/subtitles to video files.
Add Subtitles to Video with the help of MiniTool Movie Maker on Windows
MiniTool Movie Maker is a handy, full-featured video editing tool for beginners and semi-pros to quickly add subtitles to video free, add text to photo, and do basic video edits easier than ever.
Step 1. Import some video files you need.
- Download and install MiniTool Movie Maker.(It is compatible with Windows 10/8/7 computer.)
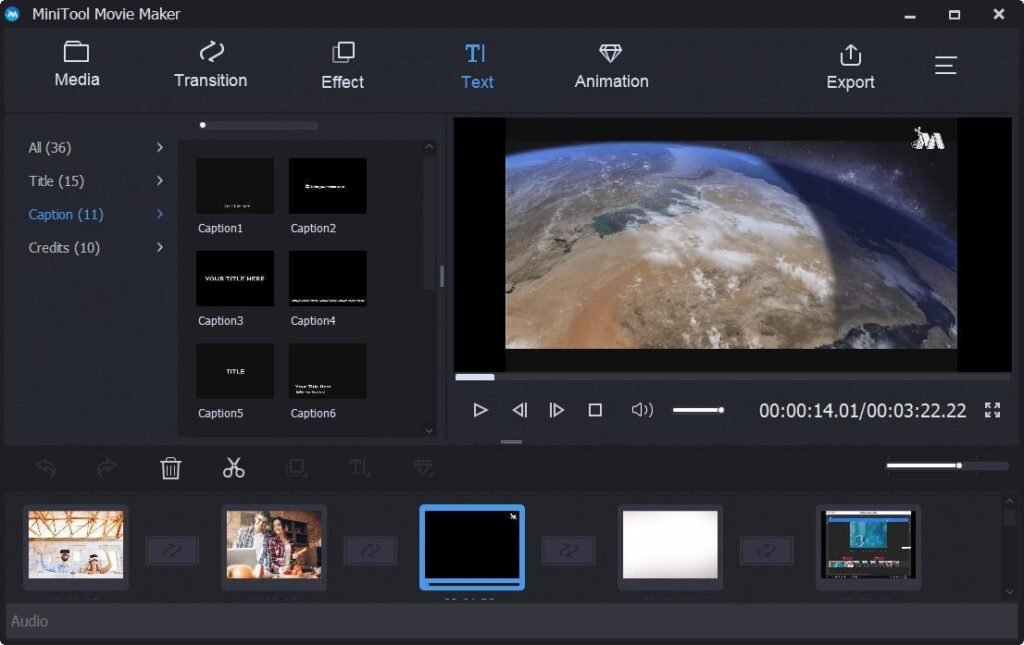
- Launch this free video editing program, after that, click the Import Media Files button to add your video files, afterward drag the imported files to the software timeline.
Supported formats include HD .mkv, and .mp4, .rmvb, .mov, .avi, .flv, .mpg, .vob, and .wmv etc.
Step 2. Add subtitles and then customize them as you like

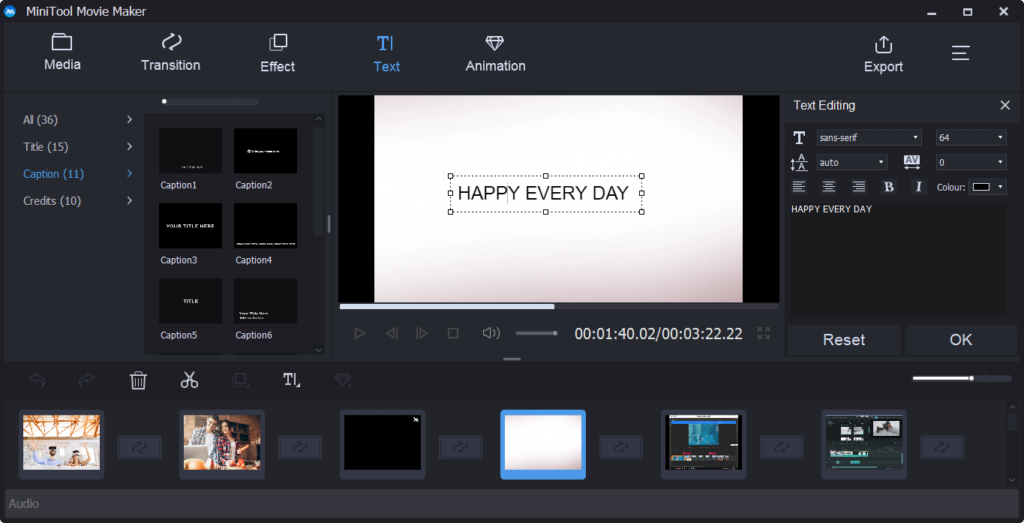
Like what is shown in the above picture, you will find a lot of text fronts for your video’s title, caption, and end credits.
To add subtitles to video free, simply select a suitable caption mode from the options, and then drag it to your video, after that, type some words that you need. (Tip: Afterward, you can change the sizes, fonts, outlines, colors of your subtitles to make them meet your requirements.)

Step 3. Now you could export the video with subtitles
After making sure everything looks good in the video, click the “Export” icon to save your video. You can save the video file in different formats, like .mkv, .ts, .wmv, .mp4, .avi, .mov, .3gp, .mpeg2, or .webm .
Not only can this video tool add text to video, but also it empowers you to create good videos with photos and/or videos.
ApproachTwo. Add Subtitles to YouTube Videos Online
Here we’ll recommend you other 2 methods to add text to YouTube videos.
Method 1. How to Use YouTube Tool to Add Subtitles Step by Step on Computer
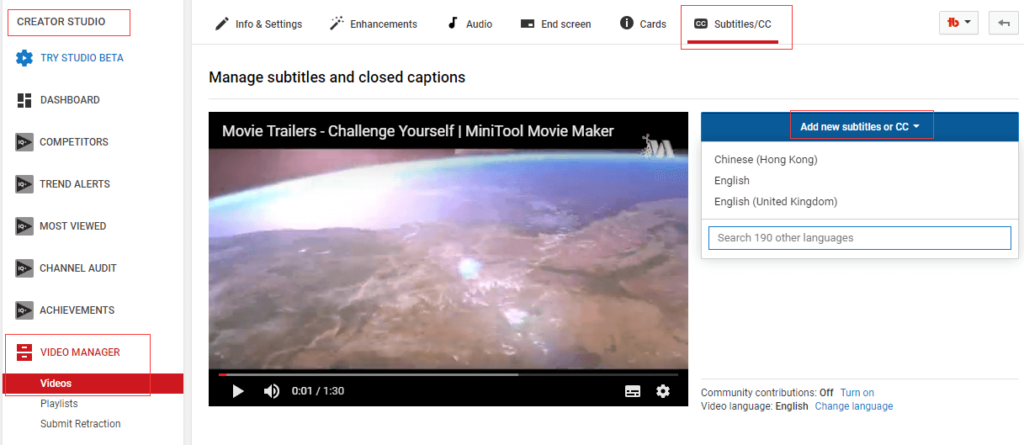
Log in to the YouTube account like you normally do, then click the “Creator Studio” option→go to the “Video Manager “option→, and click “Videos”. Select one of your videos, then click the menu that is near the Edit button, and choose the “Subtitles/CC” option, and then, click the “Add new subtitles or CC” option.

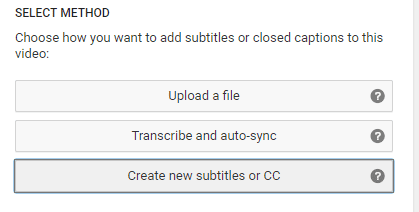
You should now select a specific subtitle language, afterward, select the “Create new subtitles or CC” option to continue.

Enter a subtitle, drag it to change its starting point, and then adjust the length of the subtitle if you are not satisfied. At last, double-check the video content to see if everything looks good. Hit the “Publish” button and get your subtitles will be uploaded to the video right away.
Method 2. Upload Subtitles from Computer for Adding them to Your YouTube Video
Step 1. Create an SRT file that is going to be used as your video subtitles
If you do not have professional text editors, Notepad will help you.→ Create your subtitles in the required format, that is, subtitle number, timestamp, and text; do make sure that each will occupy one line. (You might need to refer to some examples online.)
Step 2. Save the already edited subtitles to your Windows computer.
After confirming everything is proper, you could click “File”, then select “Save As” to store the subtitle file to your computer. Enter a filename that ends with “.srt”. From the drop menu of Save As Type, you need to select “All Files”, then click the Encoding menu and select UTF-8.
Step 3. Add subtitles to a video on the YouTube website now
- Login in YouTube normally, select My Channel, and click Video Manager →Select one target video, click Edit drop-down arrow, afterward, select Subtitles and CC.
- Please click Add new subtitles or CC → select Upload a File to choose Subtitle File now.
- Here, you should browse for the file that you newly created, select Upload.
- Adjust the subtitles (It’s an optional step). That’s all, you could publish your video with subtitles immediately.
If you need to quickly result to add subtitles or captions to a video, the easy-to-use free video editing software for Windows is a good choice, because if you do not need to make many preparations. For novice users, MiniTool MovieMaker is helpful because it offers many basic video editing operations, like adding subtitles, trimming, splitting, applying video transitions, adding music as background sound, removing audio track, and more. This feature-rich, free video editing software will meet the needs of most vloggers, YouTubers, and content creators.
Related Articles


Leave a Reply